
Want an aquarium but don’t really want an aquarium? Well, you should consider making your own jarrarium. In this blog, I’m going to tell you exactly how to create your own jarrarium. They’re easy, cheap, and fun. It’s literally like creating your own mini aquatic world.
What is a Jarrarium?
A jarrarium is well, an aquarium in a jar basically. Yes, it’s a very small aquarium, but it functions just like a regular ol’ aquarium. That means it has an ecosystem, a biofilter, and the whole bit.
The jarrarium does have its limitations, though. Since jarrariums are so small, it’s recommended that only things like snails and shrimp be kept in them. Anything bigger just can’t be sustained.
The best part about jarrariums is that the components needed to build them are very cheap. They are also very easy to make, but still very enjoyable. Putting one of these together can be a great project for the kids and the whole family.
How to Make a Jarrarium: What You Will Need
To make your jarrarium, you will need the below items. And, there is a lot of room to be creative here with the jar you pick, the substrate, plants, and decorations. Yes, this will probably be the smallest aquarium you ever own, but, you can totally do it up.
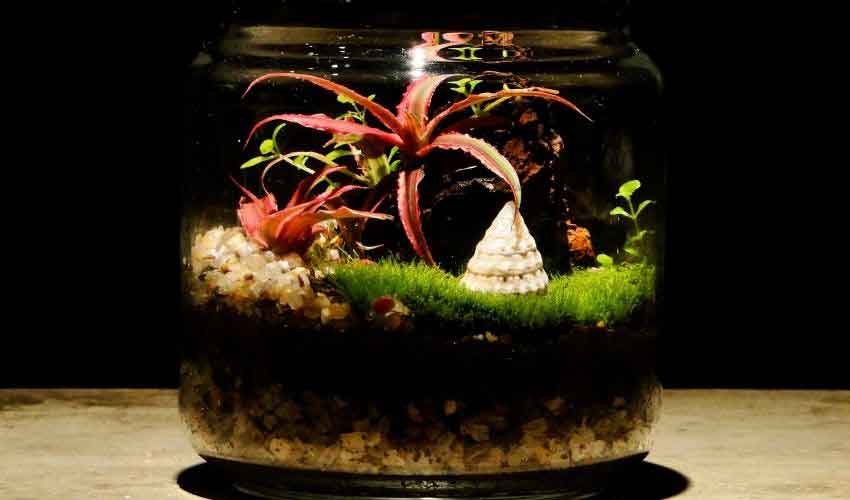
- A jar – Without a jar, this just won’t be possible. So, go find yourself a jar. A Mason Jar or any other clear jar will work. Or, you can get fancy and go find yourself an antique jar at the local second-hand store.
- Substrate – You are also going to need some sort of substrate for your mini aquarium. Your substrate will often depend on what you are keeping. For this project, let’s assume we are creating a jarrarium for ghost shrimp. Because that’s what I’m going to do.
- Water – You’ll want to start your aquarium in a jar with water from a pond. So find yourself a pond.
- Plants – Buy some moss or some other slow-growing plant. But, since this mini aquarium is going to be for ghost shrimp, let’s go with moss for this example.
- Decorations – If you plan on putting any other types of small decorations in your tank.
Setting up a Jarrarium in Seven Easy Steps
This process of setting up your jarrarium won’t take long at all, maybe a couple of hours max. However, it’s important that you follow all of the steps. You will want to pay special attention to number six in this list, cycling the water. It’s one of the most important steps in the whole process.
1. Select Your Jar
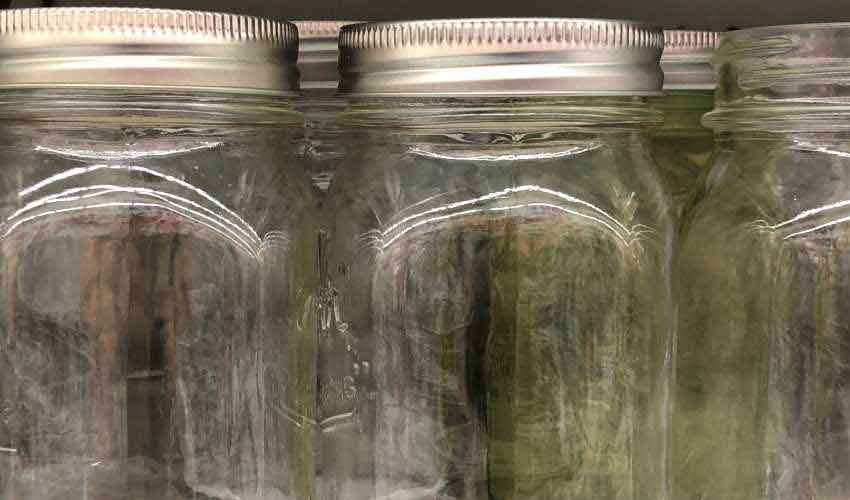
So yeah, you are going to need a jar. But, pretty much any small clear glass container will work such as a vase, old milk bottle, or vintage medicine jar. As for me, I think I’m going to go with the old school and classic Mason jar. Again though, if you really want to do your jarrarium up nicely, consider shopping for an antique jar or some unique-looking jar. Thrift stores have tons of jars and glass containers that could work for this project.
2. Add Substrate
You have options when selecting the floor of your mini aquarium. If you are going to keep plants in your jarrarium, you will want to place a small layer of soil in your tank that is an inch thick or so. You can use soil from the yard or topsoil from the store. It’s totally up to you.
After your soil is placed in the jar, you’ll want to soak the soil in water and let it sit for about a day’s time. The soil will soak up the water. This will ensure that your soil doesn’t take off and float to the top of your jarrarium once you add water.
Next, you’ll want to add sand or small gravel into your jarrarium on top of the soil. You only want about a half-inch of this. Adding sand will be great for helping with the ecosystem of the tank and keeping the soil in place.
Additionally, you can also move some of the gravel from a fish tank into a new jarrarium. It will be beneficial because of the established bacteria that already live in and on the gravel.
3. Add Plants to Your Jarrarium
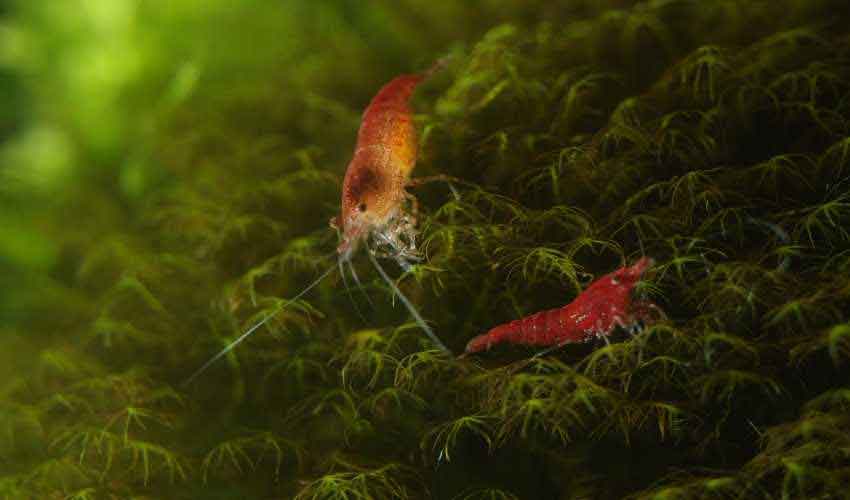
If you are adding plants to your mini-tank, which is highly recommended, you’ll want to add them right after you add the substrate. Plants will be great for the ecosystem of the tank, plus ghost shrimp should be kept with plants. I’d suggest adding moss to your jarrarium.
4. Add Decorations
Now, not that you have the biggest area to work with, but if you are going to add any small decorations to your jar, this is the time to do it. Even though your tank of sorts is pretty small, you’d be amazed at what adding a nice rock or small hideout can do to enhance the look for your jarrarium. So personally, I’d definitely say add some sort of centerpiece or decoration to your jarrarium. Make it pop.
5. Add Water
Next, you’ll want to add water to your jarrarium. For this step, I’d highly recommend adding water from a pond if you can. The pond water will contain the bacteria and microorganisms needed to help your jar build a healthy ecosystem.
Now, adding water to your jar can be a little tricky because the force of the water can mess up your substrate a bit as it’s being poured in. So, you can do the spoon trick. It’s simple really. Just pour the water onto the back of a spoon while filling your jar. This will cause the water to disperse in a manner that has less energy than if you were to pour the water directly into the jar. And, sometimes you can slowly pour the water onto a heavier decoration in the jar such as a rock or something along those lines. This too will slow the force of the water and cause it to disperse into the jar without being so destructive to the substrate and bedding of your jarrarium.
Yes, this part can be a little trickier than you would think, but using a spoon will keep you from messing up the soil and floor of your jarrarium.
6. Cycle the Water
For cycling the water in your jarrarium, if you already added pond water you’ll be ahead of the game. It will help you cycle your water faster.
But as a note, in cycled aquariums, the beneficial bacteria live in the gravel, on surfaces of porous ornaments and hideouts, and in and around the water filter.
Adding pond water is going to jump-start your lil aquarium’s biofilter. That’s because pond water already has plenty of the bacteria and micro-organisms required to build up the ecosystem.
The point of cycling is to create an ecosystem and biological filter that manages and neutralizes toxins. So to fully cycle your jar, you’ll want to sit in one place, with moderate light, and leave it undisturbed for two to three weeks. Resist the urge to check it and move it. Just let it sit. Two to three weeks will be enough time to properly cycle your jarrarium, and then next comes the coolest part.
7. Add Your Aquatic Life
Once your jarrarium is fully cycled, then you can add your aquatic life. For this example, I’ll be adding ghost shrimp. And to be realistic, shrimp and snails are about the only thing you need to consider for a jarrarium. Yes, there are exceptions to this rule. But, your jarrarium won’t be able to support a substantial amount of fish. It’s just too small. But, it will still look super cool with the substrate, plants, and a couple of ghost shrimp.
Pro tip: if you plan on adding shrimp to your jarrarium, on average I’d recommend two max. You may get away with more, but I like to play it safe.
And just like that, you have completed building your jarrarium.
Recap: How to Make Jarrarium
Jarrariums are cool little projects for anyone who wants to build a mini aquarium. Also, they are great options for people who want to experience an aquarium of sorts but don’t have the room to do so and/or don’t want to invest the time or money.
Building a jarrarium is both easy and cheap. Also, building these micro aquariums doesn’t take much time at all.
After you build your jarrarium, let us know how it works for you.
Check it Out